Bit-banging an OV7670 camera on the ESP32-S3
On this page 3 sections
Getting a grayscale camera stream onto the laptop#
The expanded Lab article includes the working pin map, packed frame format, and current capture limitations.
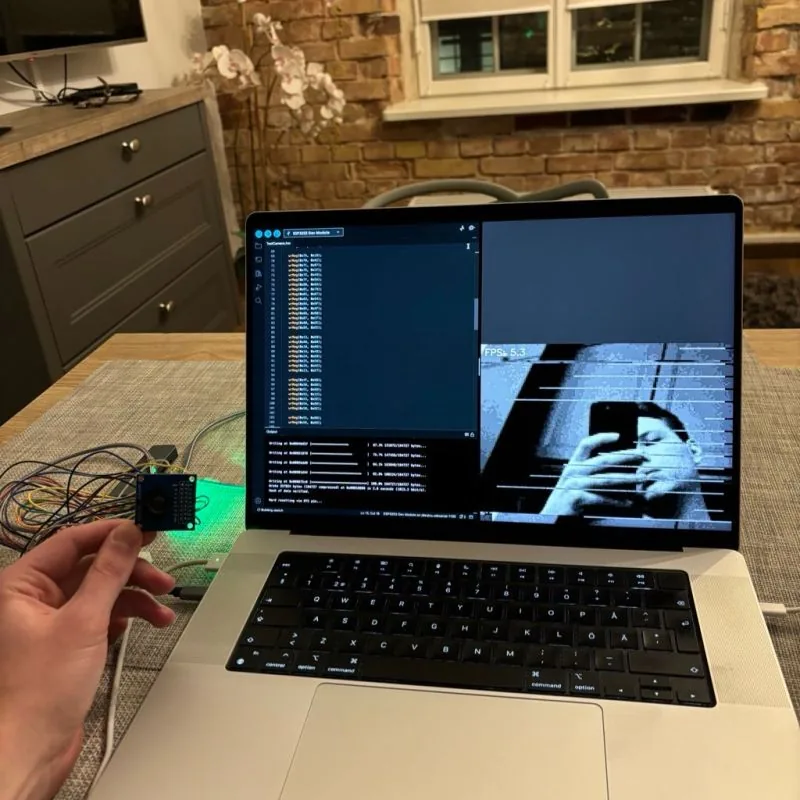
Cheap OV7670 camera and a few hours to build drivers from scratch to make it work at a decent speed with the ESP32-S3 — and it finally works.
The OV7670 is a $3 camera module that doesn't ship with a friendly API. It just outputs raw parallel data: 8 data pins screaming pixels, plus timing signals (PCLK, HREF, VSYNC). You're meant to read those pins at exactly the right moment for every pixel, register a config over I2C to tell the chip what format to output, and assemble whatever comes out into something you can actually look at.
I wanted to know what high-level Arduino camera libraries hide. So no driver libraries — just bit-banged GPIO and a register table.
What made this hard#
1. Bit-banging at the highest speeds. The camera outputs pixels synchronised to a clock signal. The sketch generates a 20MHz external camera clock; the pixel clock is a separate output determined by the camera settings. The read loop has to stay aligned with that output or it loses data.
2. YUV format confusion. The OV7670 doesn't output simple grayscale. It outputs Y-U-Y-V (luminance + colour) interleaved. So even a "grayscale" stream means picking the right byte out of every pair.
3. Register configuration. Over 100 registers control everything from gamma curves to automatic gain. One wrong value and you get black frames, white frames, or pure noise. The datasheet doesn't tell you which register is the one currently hosing your output — you have to know.
4. The tradeoff problem. More grayscale levels means more data pins to read per pixel, which means a slower clock that the GPIO can actually keep up with. Quality and speed pull in opposite directions, so the build had to find a workable middle.
What worked#
→ VGA mode with 4× downscaling — slowed PCLK enough that the GPIO loop could actually catch every edge.
→ Watching for capture stalls — timing problems could hang the capture loop. The current viewer sketch still has blocking signal waits, so explicit timeouts remain an improvement to make.
→ Reading the first byte of each YUV pair — that's the Y (luminance) channel, which is exactly what a grayscale stream needs.
→ 4-bit capture as the sweet spot — 16 shades is enough for a usable picture, and using only 4 of the 8 data pins meant the loop could keep up at the clock rate that actually worked.
The result#
160×120 grayscale at ~5 FPS, streaming over 2Mbaud serial. Built from first principles, no camera libraries, quite useful for later.
The point wasn't to compete with off-the-shelf camera modules. It was to actually understand the parallel-bus interface, the timing constraints, and the format choices that high-level libraries hide. Now I have a tiny camera capable of producing real grayscale frames I can feed straight into anything else I'm building — which is the next post.
→ More on the lab page: OV7670 camera on ESP32-S3.